FFmpeg is a quite handy app to quickly record the desktop or create a screencast in Linux, immensely useful to create tutorial videos.
I've never found the recordmydesktop app of any use, serious performance issue, screen tearing and lots of gtk related dependencies for the GUI version, gtk-recordmydesktop. While VLC could record screen in Linux, but it over kills the purpose, little screen tearing issue too.
With FFmpeg, you could customize almost every parameter to record your screen. It's capable of encoding the captured video on the fly to a wide range of formats, quite efficiently.
Contents
Install FFmpeg
FFmpeg is a quite mature software, already available in the software repository of almost every UNIX like distros. If you want compile the latest from source code, get them from here.
- In Debian, Ubuntu, Linux Mint or any Debian derivative, install it with apt.
sudo apt-get install ffmpeg mkvtoolnix
- In any Arch Linux based distro, install it with pacman
sudo pacman -Syu && sudo pacman -S ffmpeg mkvtoolnix-cli
Screen recording with FFmpeg
You may want to record the desktop only, no audio or record the desktop with audio and webcam. Lets have a quick look in some different FFmpeg options.
- -f , used to set audio/video format
- -s , size of the frame, Width x Height
- -r , video frame rate, in Hz
- -i , input device
- -vcodec , video encoding codec
- -acoddec , audio encoding codec
- -threads , no. of threads in the process
- -ac , no. of audio channel
- -vpre , video preset
- -codecs , list all available codecs
Record desktop only
ffmpeg -f x11grab -s 1366x768 -i :0.0 -r 25 -vcodec libx264 output.mkv
This will start recodding the desktop, output video will be in mkv format and encoded with H.264 codec. In my case, encoding the video with vp8 or vp9 (libvpx) video codec results very high CPU use and some frame drops.
To find display resolution , you could use xrandr , and embed this command in the final script
xrandr -q --current | grep '*' | awk '{print$1}'
Record desktop with sound
For recording with sound, first you have to find proper sound monitoring interface, I'm using pulseaudio for this purpose.
List available sound sources
pactl list sources short
You should notice an audio output ending with .monitor. In my case it's alsa_output.pci-0000_00_1b.0.analog-stereo.monitor , I'm using a little shell script for recording the desktop
#!/bin/sh
# FFmppeg Linux screen recorder
#
REC_iface=$(pactl list sources short | awk '{print$2}' | grep 'monitor')
SCREEN_res=$(xrandr -q --current | grep '*' | awk '{print$1}')

ffmpeg -f pulse -i $REC_iface -ac 2 -acodec vorbis
-f x11grab -r 25 -s $SCREEN_res -i :0.0 -vcodec libx264 output.mkv
UPDATE: Recently I've found that it's not possible to record audio with pulseaudio by using the script above. A quick fix could be by using ALSA, use -f alsa -i hw:0 options immidiately after ffmpeg in the script. Or just use Vokoscreen, details below.
Record cord desktop with audio and Webcam
First use ffplay to display the webcam, then start recording the desktop with the script above.
ffplay -f video4linux2 -i /dev/video0 -video_size 320x240
You may want to hide the ffplay window title bar to make it more clear in appearance.
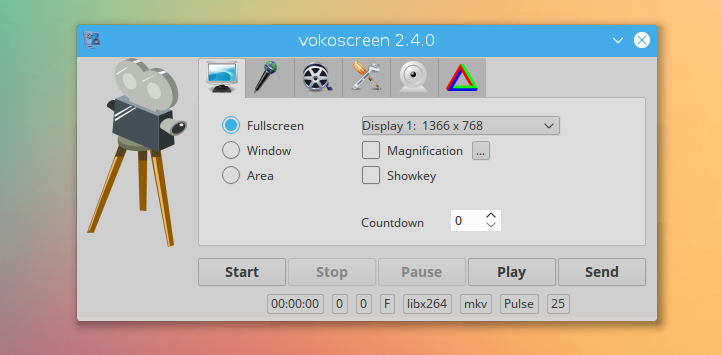
Vokoscreen, FFmpeg based GUI screen recorder for Linux
Vokoscreen is for those who want an easy to use Qt based GUI screen recorder without compromising performance and usability, I could not find single glitch in this software.
- For Debian or any Debian based distro like Ubuntu, Kali Linux, install it with apt-get.
sudo apt-get install vokoscreen
- Vokoscrreen is available in AUR for any Arch based linux distro, install it with yaourt.
sudo yaourt -S vokoscreen
Using it very simple, just few clicks to create an awesome screencast. Vokoscreen is capable of recording full screen, a window or a select area with sound and webcam.
Conclusion
No doubt FFmpeg is a great tool for recording the desktop, also very useful to convert audio/video to different formats or serve the recorded video over network in realtime with FFserver.
Am I missing something important in this tutorial ? What could be a better alternative ? Just drop a comment, I'd would like to hear from you. If you find this tutorial useful, please feel free to share it.

Hi Arnab,
just read about your recommendation for Vokoscreen, and I am installing it already for Linux. Thank you!
Olaf
I know this was posted a year ago, but that's irrelevant if your info is timeless! Thank you for this post. I've been exploring some screencasting options, and like you said, Vokoscreen seems to be an easy AND powerful tool!
I did run into a small problem trying to use your script. I too got the same result from "pactl list sources short," and found the
"alsa_output.pci-0000_00_1b.0.analog-stereo.monitor" just like you mentioned. However, when I ran the script I got the following error:
"Unable to find a suitable output format for 'alsa_output.pci-0000_00_1b.0.analog-stereo.monitor'
alsa_output.pci-0000_00_1b.0.analog-stereo.monitor: Invalid argument."
If you know what the problem is please drop me line. In the meantime, I'll do some RTFM work and see if I get it right.
Thanks for the post, and hope to hear from you.
Just checked the script after a long time, not working for me too, no sound from microphone.
Modify the script and use alsa instead.
fmpeg -f alsa -i hw:0 .... ....Hope this helps, your feedback is always appreciated. I'll update the tutorial.
Hi Arnab!
I did exactly as you said but I am facing this error
"cannot open audio device hw:0 (No such file or directory)
hw:0: Input/output error"
Any idea how to resolve this?
Probably you've to use the
hw:0,0.Or may be even
hw:1,0i you have more than one sound card.To identify the correct audio input interface, use
arecord -l