Online privacy is now everybody's concern, debates over online privacy is buzzing everywhere, and Tor is here to protect you from the prying eyes.
Tor is fairly documented and well known among privacy concerned folks, so I'm skipping the part about what is Tor, how it works and so on, this wiki article and Tor wiki seems to be very good for beginners.
Straight to the point, this tutorial is about how to setup Tor on a OpenWrt router, anonymizing all devices connected through wifi, a Tor SOCKS v5 proxy server accessible from both wifi and Ethernet LAN connection. There are few zero config devices to exactly do this, Anonabox and InvizBox, but quite expensive and locked down. Consumer routers with 64MB of RAM and a USB port are perfect for this project, D-Link DIR-505 as example.
Contents
OpenWrt Tor router hardware setup and assumptions
Tor is a memory hungry application, minimum hardware requirement by Tor wiki is 64MB of RAM and enough free space to install Tor and it's dependencies.
This could be done on a router with 32 MB of RAM and 4 MB flash storage, by tweaking the settings a bit. In such case, an extroot setup is necessary and some swap space will improve the performance.
Assuming the router connects to Internet through the WAN port, and various devices are connected through Wi-Fi, the router forwards all traffic from WiFi through Tor.
It also provides a SOCKS proxy server accessible from both wifi and ethernet adapter interfaces.
I've tested this on a TP-Link MR-3220 Router, running OpenWrt 15.05, but this should be applicable on any OpenWrt device, just modify the steps according to yours. In my case
- The WAN port is eth1, connects to internet via DHCP .
- The eth0 interface is a 4 port switch, bridged together as br-lan, IP range 192.168.1.0/24 .
- The wlan0 interface used for wifi, configured as routed AP, IP range 192.168.2.0/24 .
OpenWrt routed AP setup
- Login to the router via ssh, and take backup of all related configuration files, change the ssh IP according to your setup.
ssh root@192.168.1.1
cp /etc/config/network  /etc/config/network.bac        # On OpenWrt
cp /etc/config/dhcp     /etc/config/dhcp.bac
cp /etc/config/firewall /etc/config/firewall.bac
cp /etc/config/wireless /etc/config/wireless.bac
Though backup is not necessary, just in case something goes wrong.
- Edit /etc/config/network and add a new network interface wifi, look at the config bellow
config interface   'wifi'
    option proto   'static'
    option ipaddr  '192.168.2.1'
    option netmask '255.255.255.0'
- Edit /etc/config/dhcp and create new DHCP pool for the wifi interface, add the config bellow.
config dhcp 'wifi' option interface 'wifi' option start '100' option limit '150' option leasetime '12h' - Edit /etc/config/firewall and create a new firewall zone wifi and setup forwarding rules, add the config bellow.
config zone option name 'wifi' option input 'ACCEPT' option output 'ACCEPT' option forward 'REJECT' option network 'wifi' config forwarding option src 'wifi' option dest 'wan' config forwarding option src 'wan' option dest 'wifi' - Edit /etc/config/wireless to modify the existing Wi-Fi hotspot setup, change the option network to wifi from lan in the wifi-iface section. Don't forget to modify it according to your.
config wifi-device    'radio0'
    option type       'mac80211'
    option hwmode     '11g'
    option path       'platform/ar933x_wmac'
    option htmode     'HT20'
    option channel    '1'
    option country    'IN'
    option txpower    '20'

config wifi-iface
    option device     'radio0'
    option ssid       'Tor HotSpot'
    option mode       'ap'
    option network    'wifi'
    option disabled   '0'
    option encryption 'psk2'
    option key        'verysecret'
- Now bring up the wifi network interface and restart dnsmasq and network service.
ifup wifi
/etc/init.d/dnsmasq  restart
/etc/init.d/network  restart
OpenWrt tor setup
- Again login to the router via ssh and make sure it could connect to the internet.
ssh root@192.168.1.1
ping -c 4 google.com # On OpenWrt
- Install necessary packages,
opkg update
opkg install tor tor-geoip
- Tor will not work with misconfigured date and time, make sure of that. In OpenWrt, time is automatically synced from external NTP servers during boot.
Let's configure Tor, the /var folder is mounted as tmpfs in openwrt, I'm using a bit different configuration than usual, storing the Tor related data in /etc/tor/data folder instead of default /var/lib/tor folder. It has at-least two advantage,
- Saves around 6-8 MB of RAM.
- Establishes the Tor circuit faster after first run.
For this type of configuration, extroot is must, unless enough free space available in the device.

- First create the /etc/tor/data folder
mkdir -p /etc/tor/data
- Backup existing torrc file,
cp /etc/tor/torrc /etc/tor/torrc.bac
- Create a new Tor config file with your favorite text editor, vi or nano
nano /etc/tor/torrc
- Copy paste this configuration bellow, don't forget to modify it according to your setup.
DataDirectory /etc/tor/data/
Log notice file /etc/tor/data/notices.log

AllowUnverifiedNodes middle,rendezvous
VirtualAddrNetworkIPv4 10.192.0.0/11
AutomapHostsSuffixes .onion,.exit
AutomapHostsOnResolve 1

TransPort 9040
TransListenAddress 192.168.2.1

DNSPort 9053
DNSListenAddress 192.168.2.1

SocksPort 9050
SocksBindAddress 192.168.2.1:9050
SocksBindAddress 192.168.1.1:9050
Save the configuration and exit the text editor.
- Let's give Tor a test run,
/etc/init.d/tor start
Monitor the Tor log data with
tail -f /etc/tor/data/notices.log
You will notice a message "Tor has successfully opened a circuit. Looks like client functionality is working." within few minutes.
- Optional: You may need to edit Tor init script,
/etc/init.d/torto successfully start tor at every boot. I've to add some delay before starting the main tor process. Add sleep 30 before the procd_open_instance line close to the end of/etc/init.d/torfile.
Firewall rules to forward all internet traffic through Tor network
Add few iptables rules to forward all traffic from wlan0 interface through Tor network. This could be done in many way, add the scripts to /etc/rc.local or add it to /etc/firewall.user extra rules.
Here I'm using the /etc/firewall.user file, edit it with your favorite editor, nano or vi and add those extra lines bellow there
tor_rules() {
iptables -t nat -A PREROUTING -i wlan0 -p tcp --dport 22 -j REDIRECT --to-ports 22
iptables -t nat -A PREROUTING -i wlan0 -p tcp --dport 9050 -j REDIRECT --to-ports 9050
iptables -t nat -A PREROUTING -i wlan0 -p udp --dport 53 -j REDIRECT --to-ports 9053
iptables -t nat -A PREROUTING -i wlan0 -p tcp --syn -j REDIRECT --to-ports 9040
}
tor_rules
Restart the firewall service to take the changes effect.
/etc/init.d/firewall restart
This rules wouldn't redirect ssh and SOCKS proxy requests from any device connected through WiFi .
Avoiding issues due to low RAM
Adding a little swap space will improve the scenario to a great extent, 8-16 MB of swap space is fine, it never consumes more than 2-3 MB of swap space.
To add swap space, you may use a dedicated swap partition or simply create a swap file and use it.
dd if=/dev/zero of=/swap_file bs=1M count=32

mkswap /swap_file

echo 95 > /proc/sys/vm/swappiness

swapon /swap_file
To make it permanent add vm.swappiness=95 to the /etc/sysctl.conf file.
echo 'vm.swappiness=95' >> /etc/sysctl.conf
Add swapon /swap_file to /etc/rc.local before the exit 0 line, that's all. Here's how you can check memory usage after activating the swap.
Test the OpenWrt Tor transparent proxy and auto forwarding
Connect a device to the new Wi-Fi hotspot, the connected device should receive a IP address in the 192.168.2.0/24 range. Check if Tor working or not, open up https://check.torproject.org/ in a browser to verify if you are using tor or not. Alternatively you could check your public IP to verify this, use this command
wget -cq http://ident.me -O -
In firefox proxy configuration is pretty simple, open Edit > Preferences > Advanced > Network > Connection > Settings from the menu bar. Then choose Manual proxy configuration set SOCKS host to 192.168.2.1 and Port 9050 and SOCKS v5 and must check the Remote DNS option. A screenshot bellow,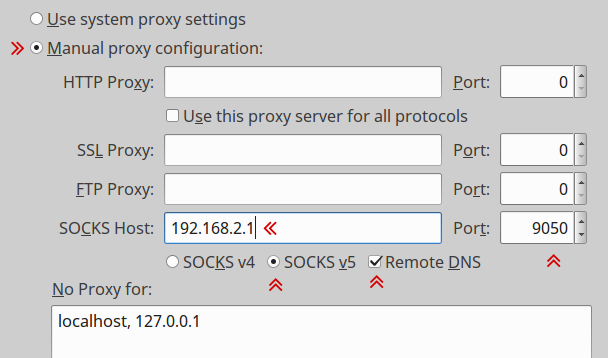 Now access some onion sites, here a good list of them, and discover a fraction of the dark web.
Final thoughts and conclusion
So I'm using Tor now, no one can track me any more ! Is it ? The idea sounds cool, but proper anonymity is a much bigger practice, requires great precaution and motivation to hide.
You should read this article, to get a rough idea of anonymity with tor and openwrt.
I hope the tutorial is simple enough to understand, if you have any suggestion or question just leave a comment. Also don't forget to check out this list of best ethernet cable for your router and home networking.
iptables is no longer included in openwrt 🙁
I had to run
chown tor /etc/tor/data
because I executed all the commands under root.
Thanks to you for writing this guide - I am learning how to use WRT and wanted TOR on a router instead of on my computer.
[all connections are redirected to Tor network, there was no way to access the SSH server from a client connected through LAN cable.] I know very little about WRT - I have installed it this week,but is it possible to have 3 LAN ports use TOR and the 4th port access SSH?
I ask because
[The eth0 interface is a 4 port switch, bridged together as br-lan,] seems to be that there are several ehternet LAN ports bridged together as one. Or are the 4 ports all together part of eth0 and they cannot be separate? If the last, then I will use WIFI as you suggest in your document.
Ciker
First thanks for your interesting comment,
Yes, all the 4 posts are part of the eth0 interface, they all have same MAC address, they can't be configured individually, atleast in my router, based on AR9331 SoC.
I was trying to tweak to the firewall rules, but about 1 hour's effort gone in vain.
There is another way, use the serial console to manage the router, but doing so will definitely void the warranty.
great and straight forward article, thanks a lot
but why not also add the option to let the lan "cable" connected users to also be through tor,
best regards
I initially though about it, but there was a problem, as all connections are redirected to Tor network, there was no way to access the SSH server from a client connected through LAN cable.
And I definitely not want to open up the SSH port for the WAN interface.
I also tried some iptables rule, but not working, so I've to find a workaround for this.
Thanks buddy for your humble advice 🙂 .
Hi,
You can make .onion addresses available in all of the network **without** having to configure a sox proxy in Firefox (or any other browser) by adding these two lines to your torrc
VirtualAddrNetworkIPv4 10.192.0.0/11
AutomapHostsOnResolve 1
This will map .onion addresses to ip addresses that the router can resolve, and all network traffic
goes through tor.
Thanks again for this excellent guide! You made my day a lot easier!
Hi Hassan,
Great tip, I've added your suggested configuration in the torrc file, thank you very much 🙂