Have you ever wanted to easily take screenshot in Linux without typing a bunch of commands or swinging the cursor? Just by pressing a key or a key combination ?
Probably yes, and here how to do that easily.
No doubt you can take screenshots in linux in many ways, it depends on your desktop environment / window managers or installed software.
As example, if yo're running KDE, Gnome or other heavyweight desktop environments, it's as easy as pressing the PrtSc key, obviously if it was configured to do so.
What about if you're running lightweight desktop environments like LXQt, LXDE or no desktop at all?
So in that case you have to configure hotkeys and a software to capture screenshots, lets get started.
Contents
1. Choose your screenshot taking software
The very first thing you have to do is choosing a screenshot taking software. There are many of them, like Shutter, KDE's Spectacle and Gnome Screenshot . and others.
Some window managers like compiz and photo viewers can take screenshots too, lximage-qt is an example.
Scrot is a command line based screenshot utility with many configuration options, good for automating the screenshots with hotkeys.
In this tutorial I'm going to use Scort and lximage-qt, both of them are in the software repository of popular Linux distros, in Debian or Ubuntu you can install it with the following commands.

sudo apt-get install lximage-qt
sudo apt-get install scrot       # Install Scrot
2. Configuring a hotkey daemon
For easily taking screenshots, you have to configure some shortcut key combination.
There is no standard procedure set hotkeys in Linux, it depends on many thing, most important of them how you want to do that, and probably hotkeys already configured if you're running KDE, Gnome, Cinnamon.
Here I'm going to use the lxqt-globalkeys application, though it's LXQt specific, you can use it with other desktop environments too.
So first you need to install lxqt-globalkeys and configure it to start automatically when a desktop environment is started.
In Debian and Ubuntu, use the command below to install it,
sudo apt-get install lxqt-globalkeys
Now ensure the globalkey daemon lxqt-globalkeysd is started, in Debian you've to do nothing for that, but for me it's not started automatically in Ubuntu.
In Ubuntu, you've to add an autostart script or .desktop file, I'm using LXQt Session Setting for doing so.
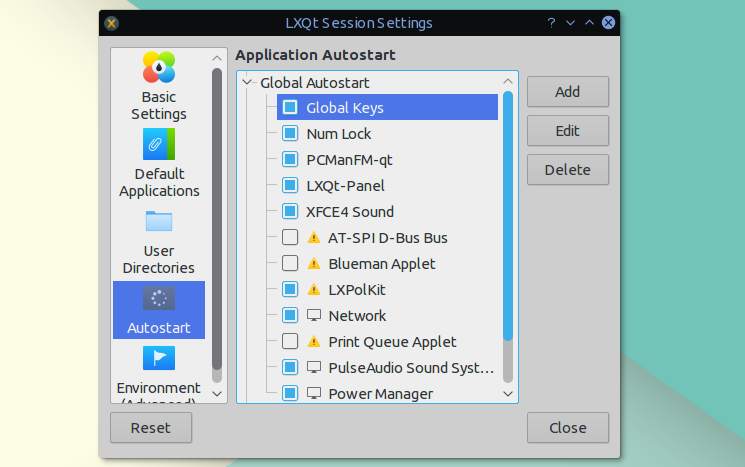 Add a new application autostart, name it whatever you like, and put the below line there.
lxqt-globalkeysd > /dev/null 2>&1
Content inside the .desktop autostart file, ~/.config/autostart/Global\ Keys.desktop should look like below.
[Desktop Entry]
Exec=lxqt-globalkeysd > /dev/null 2>&1
Name=Global Keys
Type=Application
Version=1.0
3. Binding hotkeys with Linux screenshot tools
Let's bind a screenshot tools with a hotkey combination for easy screenshot in linux.
Open up the Shortcut Key from LXQt configuration center or launch it directly with the lxqt-config-globalkeyshortcuts command.
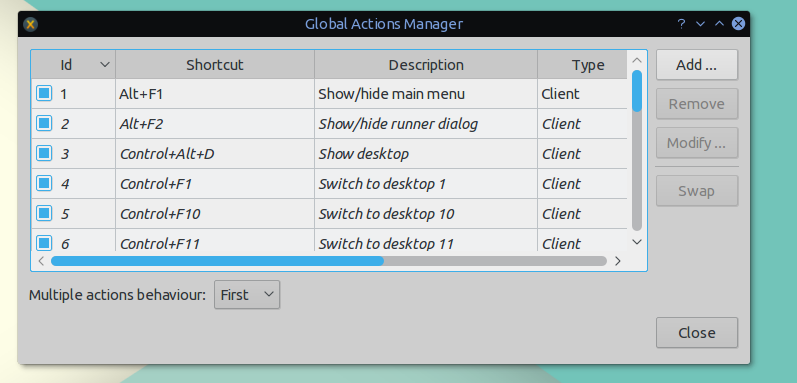
Now add a new shortcut key, it's pretty easy to do so with the GUI, just hit the add button and follow the instruction, example screenshot below.
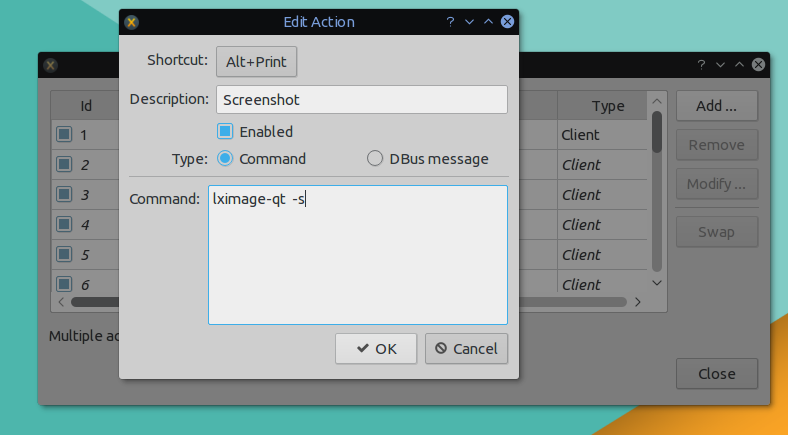
This setup above will bind the Alt + PrtSc key combo for taking screenshots with lximage-qt.
You can also bind some hotkeys with scrot or maim for some advanced linux screenshot functionality.
Some examples here,
- Take screenshots with datestamp and timestamp in the image name with scrot.
scrot '%T_%d-%m-%Y'.png
- Move the screenshot automatically to a folder named screenshots, be sure the desired folder exists.
mkdir -p ~/screenshots
Now screenshot command, we're using the -e option of scrot.
scrot '%T_%d-%m-%Y'.png -e 'mv -n $f ~/screenshots/'
- Edit the screenshot with easypaint after moving it to the ~/screenshots/ folder.
scrot '%T_%d-%m-%Y'.png -e 'mv -n $f ~/screenshots/ && easypaint ~/screenshots/$f'
In case you want to add some delay, use the -c option with scrot.
This could be done easily with other applications like shutter, but the above example is more suitable for automating the screenshots and editing.
Conclusion
Hope you enjoyed this simple trick to automate your Linux screenshot tools. You might be also interested in screen recording in linux, have a look there.
Got something to say ? Or some problems ? Let us know through the comments, also consider sharing this tutorial with friends. In a future post we'll discuss about some best screenshot tools for Linux, stay connected.
Leave a Reply