Dnsmasq is an incredible piece of software, an integrated DHCP, DNS, PXE and TFTP server. It's extremely lightweight and easy on CPU and uses very low memory, perfect for constrained embedded systems.
Using dnsmasq significantly improves web browsing experience, much better than the browser's inbuilt DNS cache.
However there are better DNS servers around, why dnsmasq ? As said earlier in this article, it's not just a caching DNS server, it's lightweight and easier to configure. I'm using dnsmasq as TFTP and PXE server too.
Also check out - Best ethernet cable list.
Contents
1. Installing Dnsmasq
Dnsmasq is available as pre-compiled binary package for almost every Linux distro, for Debian and it's derivatives like Ubuntu, Linux Mint, install dnsmasq with the following apt command.
sudo apt-get install dnsmasq
For Archlinux and it's derevatives like Manjaro, Chakra Linux use this command.
sudo pacman -S dnsmasq
Create a new group dnsmasq , will be used later in the dnsmasq configuration file.
sudo groupadd -r dnsmasq
2. configuring dnsmasq as DNS server
Let's edit the dnsmasq configuration file to use it as caching dns server, there is one main configuration file /etc/dnsmasq.conf , and it could also load many individual configuration files from the /etc/dnsmasq.d/ directory.
First backup the original dnsmasq.conf file to avoid to fix the configuration mess up, if there's any.
Then start editing the main configuration with your favorite text editor like nano, Gedit etc.
sudo cp /etc/dnsmasq.conf /etc/dnsmasq.conf.bac
sudo nano /etc/dnsmasq.conf
Note: Editing the configuration file requires root privilege.
Look at the dnsmasq example configuration I'm using in a Debian testing system.
# Interface, user and PID
#
listen-address=127.0.0.1
port=53
bind-interfaces
user=dnsmasq
group=dnsmasq
pid-file=/var/run/dnsmasq/dnsmasq.pid

# Additional configuration
#
no-poll
bogus-priv
neg-ttl=3600
cache-size=1000
dns-forward-max=150
domain-needed
resolv-file=/etc/resolv.personal
addn-hosts=/etc/hosts.adblock
You may directly copy-paste and save the above configuration, now I'm explaining a little what these configuration options mean.
- listen-address , use this IP as DNS server IP.
- port , bind this port to the above IP, 53 is the default DNS port.
- bind-interfaces , it forces dnsmasq to really bind only the interfaces it is listening on.
- user and group, dnsmasq daemon's user and group.
- pid-file , path to the PID of dnsmasq.
- no-poll , don't poll /etc/resolv.conf for changes.
- bogus-priv, bogus private reverse lookups.
- cache-size , max limit of cache size in memory.
- resolv-file , DNS resolver file used by dnsmasq to resolve from internet.
- addn-hosts , use a additional host file, very useful.
- neg-ttl , it determines the DNS request TTL values, by default set to 3600 seconds.
- domain-needed , it prevents forwarding invalid or specific DNS quarries to upstream DNS servers. As example, when used in the configuration, dnsmasq won't forward the quarries like localhost or server1.localhost to the servers listed on the /etc/resolv.personal file.
- dns-forward-max , this value represents the number of domain names to cache by dnsmasq.
Note: It's also possible to run dnsmasq as root user and group, but experts suggests not to do so.
The addn-hosts option is interesting, you could use a long list of domains pointing to localhot(127.0.0.1) to block malicious web advertisement.
Now create the /etc/resolv.personal file, which is used by dnsmasq to resolve unknown DNS requests from another upstream DNS server.
sudo nano /etc/resolv.personal
And put some nameserver there like bellow.
nameserver 103.25.56.238
nameserver 111.67.16.202
I'm using OpenNIC DNS servers above, they don't keep any log and updated very fast.
Finally restart dnsmasq so new configuration could be loaded, restarting dnsmasq could be different for different linux distros, first try with the service command on Debian based systems.
sudo service dnsmasq restart
If it fails anyway, try again with systemctl command. As systemd is now the default init daemon on most linux distributions, including Archlinux and derivatives.
sudo systemctl restart dnsmasq.service
Now the dnsmasq caching dns server is running and listening for DNS quarries on port 53.
3. Using the dnsmasq cached DNS server
Configure your connection manager like Network Manager , Connman or Wicd to use 127.0.0.1 as DNS server. This step may be different, depend upon whic connection manager you are using.
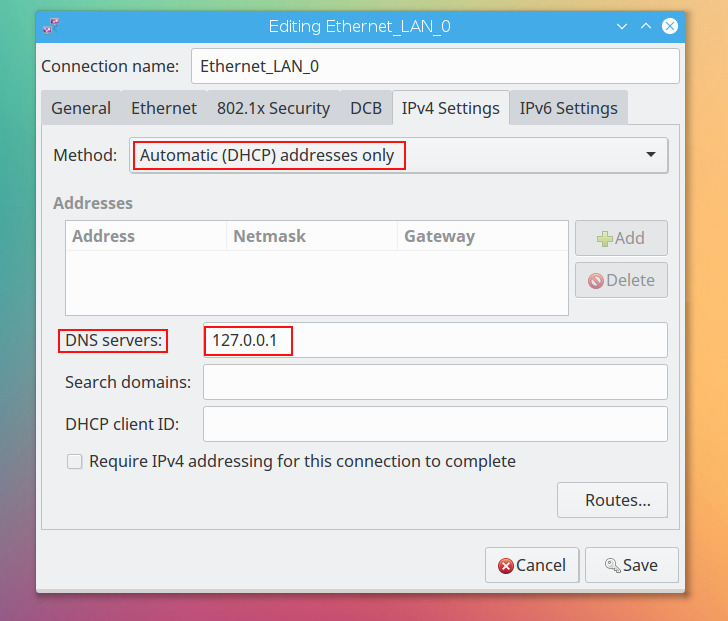
For Network manager, edit your connection and set Method: to Automatic (DHCP) address only and set DNS servers: to 127.0.0.1 , exaple screenshot bellow.
Ubuntu, Linux mint or other Ubuntu based Linux distro may be already using another name server information handler like resolvconf , surely it will conflict with dnsmasq.
So if you are planning to use dnsmasq on ubuntu as caching dns server, better to stop resolvconf first, have a look on commands bellow.
sudo service resolvconf stop
sudo update-rc.d resolvconf remove
sudo rm -f /etc/resolv.conf
su -c "echo 'nameserver 127.0.0.1' > /etc/resolv.conf"
4. Testing the cached DNS server
To ensure your your system is using 127.0.0.1 (loopback address) as DNS server, look inside the /etc/resolv.conf file,
cat /etc/resolv.conf
It must contain a line nameserver 127.0.0.1 , You can check the time required to resolve a domain name with the following command
time dig +short facebook.com
First it may take some time, about 0.5-2 seconds, now run it again, the reply will be instant, just few miliseconds.
Flush dnsmasq DNS cache: If you ever need to flush DNS cache, just restart dnsmasq server and all cache will be flushed from memory.
sudo service dnsmasq restart
Conclusion
Dnsmasq is extensively found on OpenWrt, dd-wrt and other router firmwares, one of the most important software there. It's also used by Network Manager as DHCP server to share internet connections.
Dnsmasq DNS server also minimizes the risk of dns leak. Know more about the basics of dnsmasq in this wiki article.
So that's it, how to configure dnsmasq dns server with caching support in a Linux system for super fast DNS lookup and more. If you have any suggestion or question just leave a comment, also don't forget to share your thought on dnsmasq here.
Your spell checker is using the word "quarries" in several places - I believe you mean "queries"
You didn't explain the following parameters:
neg-ttl=3600
dns-forward-max=150
domain-needed
Explained and updated the post.
good explanation. Thanks!
Do you have any suggestion/hint for memory usage per cached dns address ? Lets say If i set the cache size to 500,000 how much memory is assumed to be used.
Wow! what a question!
Truly I've no idea. It would be fun to do a little experiment to find that out.
Thanks for this clear explanation !
Can u please more explain the addn-hosts option ?
i am into using dnsmasq to block ads on http request .
Thanks a lot for the explanation.
I was running other docker containers which was using the UDP default port. But dnsmasq was already running so docker containers were failing.
The "port" flag really saved my day. There was no flag "port" in the default dnsmasq.conf file and adding this flag made it work on a different port.
You're most welcome Anirban.
Thanks for the feedback.