A short and insecure SSH password is nightmare, while typing a long password just to login kills productivity. So, here's how you can setup password less SSH login to your servers or any machine with SSH service enabled.
I've found that it saves a lot of time. So it's worth implementing if you've to deal with many servers, or other SSH related stuffs like SSHFS server.
Here we're assuming that the server already has SSH service enabled and running. Here we're not setting up SSH server on the client side, lets' get started with passwordless SSH.
Contents
1. Generate the SSH key
Again assuming you've installed a SSH client like openssh-client on the client machine, first you need to generate the SSH key.
For that, we're going to use the ssh-keygen command, part of the openssh-client package in Ubuntu or any Debian based system.
ssh-keygen -t rsa
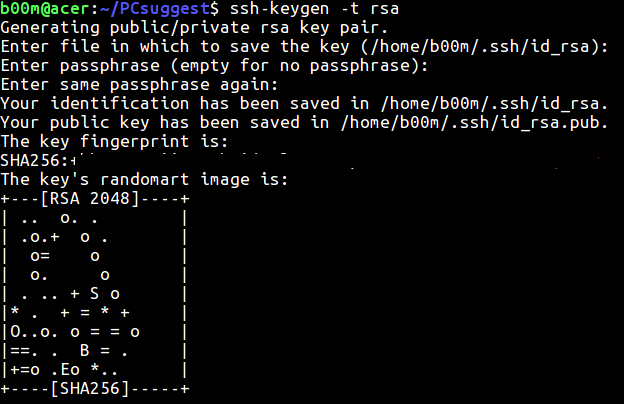
You don't need to enter any passphrase, just keep tapping Enter key. This command will create your 2048 bit RSA key, available under the ~/.ssh directory by default.
If you need other type keys like DSA or ECDSA, add their respective name after the -t argument with the ssh-keygen command.
ssh-keygen -t dsa
I think the 2048 bit RSA key is strong enough for regular non-critical use. However if you want to harden the key, use the -b argument with the command.
ssh-keygen -t rsa -b 4096
2. Copy the SSH public key to the remote server
There's two type of SSH key for password less SSH login, a public key and a private key. The id_rsa is your private key and id_rsa.pub is your public key.
You need to copy only the public key to the remote server, either with the ssh-copy-id command or somehow manually.

The typical syntax to copy the SSH public key is like below.
ssh-copy-id username@remote.host.name
A more legible example could be like,
ssh-copy-id root@192.168.1.6
You'll be asked to type your current password to authenticate, type that. You'll be asked to prove authenticity of the remote server, just type yes.
Alternatively you can login to the remote server and create a text file under the ~/.ssh directory like below.
nano ~/.ssh/authorized_keys
Copy paste the contents of your ~/.ssh/id_rsa.pub file from your local machine there, save and exit the text editor.
3. Testing password less SSH login and notes
Now you should be able to login to the remote server without typing the password. Next you might want to disable SSH password based login for more security.
Note: Your private key is very important, don't ever share it with any one or never loose it. Also never overwrite existing keys, if you're using one previously. Simply you'll loose passwordless SSH access to your servers.
Hop this quick guide to enable passwordless login is simple enough to understand, If you've any suggestion or question, ask through the comments.
Common errors and fixes
Sometimes due to various reasons, like by reinstalling the operating system on the server or your local system you can get errors like WARNING: REMOTE HOST IDENTIFICATION HAS CHANGED!
This could be easily fixed by deleting the known_hosts file on the .ssh directory or simply by running a command. An example below.
ssh-key -R 192.168.1.101
Here 192.168.1.101 is the remote system, this could be either an IP address or a hostname.
Leave a Reply