Linux live USB drives are one of the most useful tool that every Linux user should keep handy. They are life saver in case of system crash and configuration mess up.
This tutorial will help you to put multiple Linux live ISO files inside a singe bootable USB drive very easily, without any mess.
requirements:
- One USB pendrive, 4 GB or more recommended.
- Linux live CD distribution or Linux installer ISO files.
- A machine running a Linux distribution of your choice.
Contents
1. Format the USB drive
Before continue, take backup of all important data of that USB drive and make sure that this is the drive to format.
Now format the drive with a single FAT32 partition, with software of your choice like Gparted or mkfs .
Here's how to format the drive with the mkfs command.
sudo mkfs.vfat -F 32 -n your_drive_name /dev/sdc1
make sure that which drive and partition you want to format, in this case it was /dev/sdc1 and change your_drive_name with any name of your choice. Or use Gparted, there is lesser amount of risk involved with it.

2. mount partition and create folders
After formating, mount the partition to a easily accessible folder with read write permission and create required folders.
mkdir ~/multiboot

sudo mount /dev/sdc1 ~/multiboot/

cd ~/multiboot/

mkdir boot

mkdir iso_boot
The boot directory to store GRUB bootloader related files and iso_boot directory to store Linux installer ISO files.

3. Install GRUB on the USB drive
Now install the GRUB bootloader on the USB drive. Depending your your system, GRUB could be either x86_64-efi or i386-pc, but here we are going the use the i386-pc platform.
sudo grub-install /dev/sdc --target=i386-pc --boot-directory=~/multiboot/boot/ --force
note: Use only /dev/sdc not /dev/sdc1 , wait for some time, this process may return some error message but it's fine.
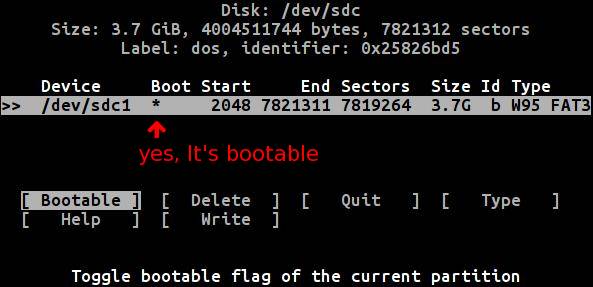
4. toggle the USB drive bootable flag
If the the drive is not already bootable, toggle the boot flag with parted , cfdisk or fdisk .
One line parted command to toggle boot flag.
sudo parted /dev/sdc toggle 1 boot
With cfdisk , just run the command and follow the interactive cfdik CLI interface and watch the * mark.
sudo cfdisk /dev/sdc
5. Copy ISO files
Now copy the ISO files of various distributions like Ubuntu, Debian, Linux Mint etc. to the ~/multiboot/iso_boot folder. Use a file manager like Nautilus , Dolphin, etc. or do it with the cp command.
6. Create the grub.cfg file
Everything is almost ready, now just create the grub configuration file to make the ISO files available to boot from USB drive. Create a text file with a text editor of your choice inside the ~/multiboot/boot/grub/ folder. Then put the text bellow.
# Multiboot USB drive GRUB configuration file

#  By:~    https://www.pcsuggest.com

set timeout=10
set default=0
insmod loopback

menuentry "lubuntu 14.04.1 32 bit" {
loopback loop /iso_boot/lubuntu-14.04.1-desktop-i386.iso
set gfxpayload=keep
linux (loop)/casper/vmlinuz boot=casper iso-scan/filename=/iso_boot/lubuntu-14.04.1-desktop-i386.iso noeject noprompt --
initrd (loop)/casper/initrd.lz
}

menuentry "kali linux 1.0.3 live" {
set iso_file=/iso_boot/kali-linux-1.0.3-amd64.iso
loopback loop $iso_file
linux (loop)/live/vmlinuz boot=live noconfig=sudo username=root hostname=kali noswap noautomount
initrd (loop)/live/initrd.img
}

menuentry "TinyCore Pure64 6.2" {
set iso_file=/iso_boot/TinyCorePure64-6.2.iso
loopback loop $iso_file
linux (loop)/boot/vmlinuz64 loglevel=3 cde vga=normal
initrd (loop)/boot/corepure64.gz
}
Finally modify the ~/multiboot/boot/grub/grub.cfg file according to your need.
Complete ! Now you can use this USB drive to boot multiple Linux live CDs.
Further reading > Write your own GRUB menu entry
- mount the Linux installer ISO file of your choice.
- find the path and name of kernel.
- find the path and name of initrd.
- find the boot time kernel parameters, usually find in the syslinux.cfg or grub.cfg file
- write down them in the ~/multiboot/boot/grub/grub.cfg file.
An example grub menu entry
menuentry "My Distro Name" {
set iso_file=/path/to/your_iso_file.iso
loopback loop $iso_file
linux (loop)/path/to/your_kernel your_distro_spacific_boot_time_kernel_parameters
initrd (loop)/path/to/your_initrd_file
}
Conclusion
So, that's it 🙂 . Follow this tutorial and create your own grub configuration to make a multiboot USB. This bootable USB also could be used for GRUB rescue and recovery.
Don't forget to share your experience with us via comments. Also if you need any help just leave a comment.
My grub.cfg for Kubuntu 21.10 and Clonezilla 2.6.6:
set timeout=10
set default=0
insmod loopback
menuentry "Kubuntu 21.10" {
set iso_file=/iso_boot/kubuntu-21.10-desktop-amd64.iso
loopback loop $iso_file
set gfxpayload=keep
linux (loop)/casper/vmlinuz file=(loop)/preseed/kubuntu.seed iso-scan/filename=${iso_file} maybe-ubiquity quiet splash ---
initrd (loop)/casper/initrd
}
menuentry "Clonezilla 2.6.6 live" {
set iso_file=/iso_boot/clonezilla-live-2.6.6-15-i686.iso
loopback loop $iso_file
linux (loop)/live/vmlinuz boot=live components config findiso=$iso_file ip=frommedia toram=filesystem.squashfs union=overlay username=user
initrd (loop)/live/initrd.img
}
...And the same exact error message if I execute this command: $ sudo parted /dev/sdb set 1 boot on
HELLO! Thanks in advance for your help... At step four, I enter the command you say, and I have the message... "Error: The flag 'boot' is not available for loop disk labels." Any idea of this?
Are you sure that /dev/sdb is your USB drive ?
Why FAT32..?
Because seamless data transfer between Linux, Windows and Mac, here ext2 is not best choice.
I use bootable USB drives for data transfer to.
Hi,
thx for this tuto but it means :
1) is target for non persistent distribution use
2) why not using a second partition on the same USB to save desired data that could be access from any booted distribution ?
Perhaps this must be add at the end of this tutorial.
Have a nice day.
Thank for your valuable comment.
Yes , it targeted for a non persistence use,actually for installing a new distro.
A second partition , a good idea, but you could this partition too.
I'll add both of them soon in this tutorial. Have a nice day too.
The devil is in the details of writing the grub.cfg. I tried a couple of entries and neither of them booted, I'm afraid I have to look elsewhere since I don't have a clear understanding of the intricacies of the Linux boot process and initrds.
yeah, writing the proper grub.cfg very important. I too never could make a bootable fedora live USB by editing the grub.cfg, different distro uses different style boot process. Best of luck and never stop experimenting. Anyway I'll try to write a detailed post about writing the grub.cfg.