The kernel is responsible for almost every low level task in any OS. You may want to tweak it to get most out of your hardware. So, here's how to compile Linux kernel from source to build your own custom kernel.
Most cases you don't need to build linux kernel from source to achieve better performance, however there's some other reason to build a custom kernel.
- The default kernel shipped with your Linux distro isn't good enough.
- You may want to test some new kernel feature.
- To learn how to optimize custom kernels, they're hugely popular among experienced android users.
So, lets get started with kernel customization.
Contents
1. Install compilers and development tools
First you need to install some development tools and a C, C++ compiler, in this case the compiler system is GCC.
As I'm using Ubuntu this time, I'll show how to install those development tools in Ubuntu and other Debian based distros.
sudo apt-get install build-essential libssl-dev libncurses5-dev bison flex
If you want to use a more convenient GUI tool to configure the kernel, also install some Qt app development tool and library.
sudo apt-get install qt5-default qt5-qmake qtbase5-dev qtbase5-dev-tools
The Qt based configuration tool is much easier to use then the ncurses based interface.
2. Get the Linux kernel source code
There's many way to download the latest Linux kernel source code, you can clone the kernel git repo, download it from the official site or install it through apt.
I prefer to download the tar.xz archive from https://www.kernel.org/ , extract the archive after downloading it.
tar -xf linux-4.10.10.tar.xz -C ~/
Alternatively you can clone the bleeding edge kernel with git.

git clone https://github.com/torvalds/linux.git
You can also downoad zip or tar.gz archives from here.
Or install the kernel source with apt, I think it's the worst choice.
sudo apt-get install linux-source-4.10.0
3. Prepare the kernel configuration file
That's the most important step of this entire tutorial. A properly configured kernel could save 2 to 3 seconds of boot time, improve overall system performance and responsiveness.
To prepare the configuration file, you're going to need a base kernel configuration, it's a plain text file.
You can get that under the /boot directory of your existing Linux install, as config-(kernel version) , as example in Ubuntu with kernel version 4.4.0-21-generic, it's config-4.4.0-21-generic .
You can copy that or generate your own with the make config , make nconfig , make menuconfig or make xconfig commands.
But manually configuring the kernel is a quite difficult task, so it's wiser to copy an existing configuration and customise it. Example ~
cp /boot/config-4.4.0-21-generic ~/linux-4.10.10/.config
To update the configuration file according to the newer kernel, use the make silentoldconfig command. This step is quite annoying, I just pressed and held the Enter key it.
4. Customize the kernel configuration
Now use the make xconfig command to modify the kernel configuration.
cd ~/linux-4.10.10/
make xconfig
You need to be careful while tweaking around various options, a little mistake could result in an unbootable kernel.
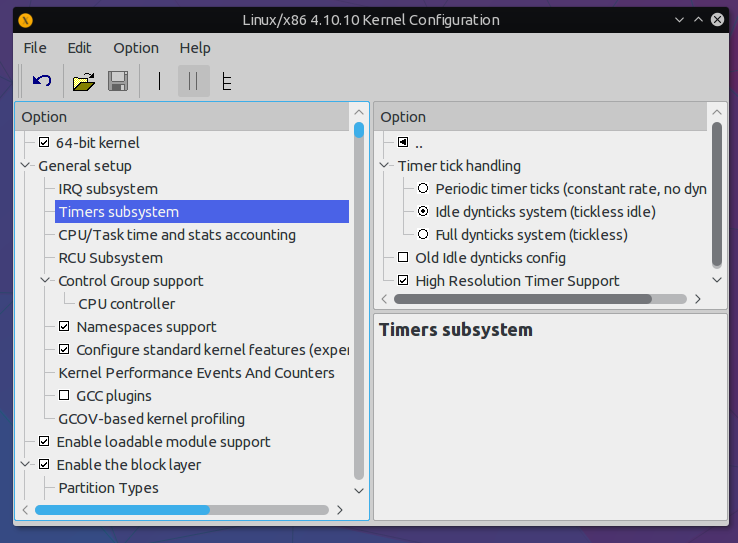
Above a screenshot of the Qt based configuration editor tool, it's very easy to use, use Ctrl + F key combo to easily find different options.
What I changed to make the kernel smaller in size and more efficient.
- First I disabled CONFIG_DEBUG_INFO, I don't want to debug anything.
- All filesystem drivers are compiled as kernel module, as GRUB is going to load a initramfs anyway.
- As it's a Intel processor, removed almost every AMD related options.
- As I'm never going to boot this kernel on any virtual machine, so removed Linux guest support, CONFIG_HYPERVISOR_GUEST and CONFIG_KVM_GUEST.
- There's no need of Macintosh and Chromebook related options, so disabled them too. I don't know why they were enabled by default.
- Used xz as kernel compression method.
- Disabled bzip2, lzma, lzo and lz4 compressed initramfs support, under CONFIG_BLK_DEV_INITRD .
- I thought TMP hardware is useless, and my laptop's motherboard doesn't have one, so disabled TPM reated configurations.
- And disabled many more useless options, which I can't remember now.
Here you can get a copy of my .config file, you can use it as a base and customise it according to your need.
If you're planning to use the make localmodconfig command, perhaps there'll be some missing device driver.
5. Compile Linux kernel from source
Lets build the kernel,
cd ~/linux-4.10.10/
make help
The make help command will show some help text, check various options there.
You may also want to minimise the build time with parallel compiling, use the -j option with make , before that check how many CPU cores in your system with the nproc command.
Building distro specific kernel packages is the best way to install custom kernels. It's much easier to manage everything later.
In kernel 4.10.10 and above, there's few script to directly build deb and rpm packages.
cd ~/linux-4.10.10/
make -j4 bindeb-pkg
The above command will build 5 deb packages in the parent directory, in this case it's the home directory. You need to install 4 of them.
cd ~/
sudo dpkg -i linux-firmware-image*.deb linux-headers*.deb linux-libc-dev*.deb
sudo dpkg -i linux-image*.deb
Install the linux-image package at last, else you may encounter some problem. There's no need to create the initrd or update the GRUB.
Now I'll go through the generic way to build Linux kernel and install it. You may not want to compile everything with make all, just compile the kernel and and device drivers.
- Compile the kernel, run
make -j4 - Build the kernel modules,
make -j4 modules - Install kernel modules,
sudo make modules_install - Install firmware files,
sudo make firmware_install - Finish the installation,
sudo make install
You don't need to create the initrd file or update the GRUB, make install command will take care of everything.
6. Testing the new kernel and conclusion
Finally reboot your system to test the newly built kernel, select the GRUB entry with your new custom build kernel.
If everything is configured properly, the PC should boot with minimal error. You could check the new kernel version with uname -a command.

You might also want to check kernel errors with dmesg command, and try to fix them, here fixing means recompile every thing.
So what's the advantage of my newly build custom linux kernel ?
- Graphics benchmark performance increased reasonably, I don't know why.
- I managed to boil down the bootable kernel(vmlinuz) size to 3.3 MB, Ubuntu default kernel is around 6.7 MB, the system boots faster.
- nVIDIA Optimus now works better, again I don't know why. Performance improved and
optiruncan turn on and turn off the discrete GPU under 1.2 seconds, previously it was around 1.6 seconds.
Conclusion
Any disadvantage ? Of course, there's few glitch in this kernel.
I spent almost 3 days to make it minimal and usable, and still it's no where near perfect. I've to manually load fbcon kernel module through the /etc/modules file to get a tty console after system boot.
That custom kernel may panic while booting or could lead to grub rescue. So, be prepared for such troubleshooting.
That's all about how to customize and build linux kernel from source, I hope it's easy enough to understand.
So what do you think about kernel customization and what's your experience ? Leave your comments below.
i had been try to install it ,but fail...
it missed qt5-default pkg-config
Thanks!
Im in the process of building a minimal kernel aswell. thanks and good luck.
Thanks buddy, in this post you're the first to comment and inspire.
Please share your kernel configuration and experience when you're done.